Monday, August 12, 2013
Sunday, February 3, 2013
Higanteng si Eleyna
Papakilala kita kay Higanteng Eleyna. Siya ay trese anyos na dalagita. Mabait ang puso ni Eleyna ngunit parati siyang kinakatakutan dahil iba sa anyo niya at kasing laki niya ang mga bundok na nakapalibot sa lugar nila.
Lumalayo si Eleyna sa lugar nila dahil takot sakanya ang mga tao. Ang hindi naman alam ng mga tao ay mas takot pa si Eleyna na masaktan niya ang mga tao.
Kaibigan niya ang lahat ng hayop sa tabing gubat dahil doon lang siya komportable at sila lang ang nakakaunawa kay Eleyna.
Alam ng mga hayop ang istorya ni Eleyna. Na hindi dating kakaiba at nakakatakot ang Higanteng si Eleyna..
Labels:
alamat,
bahaghari,
bata,
clouds,
dalagita,
giant,
godess,
Higanteng Elena,
illustration,
inspiration,
istorya,
kubo,
nico dela cruz,
story
Thursday, January 31, 2013
Baler
My first shot from our kubo in Pacific View.
Locals
Some local kids on their way to the surf.
After taking their pictures they giggled and ran.
Labels:
aurora,
baler,
mahdox surf school,
Philippines,
quezon,
snaps,
surf,
surfing,
waves
Sunday, December 23, 2012
Pathfinder- How to use the Pathfinder in Illustrator
Welcome to Pathfinder :)
1. Unite
2. Minus Front
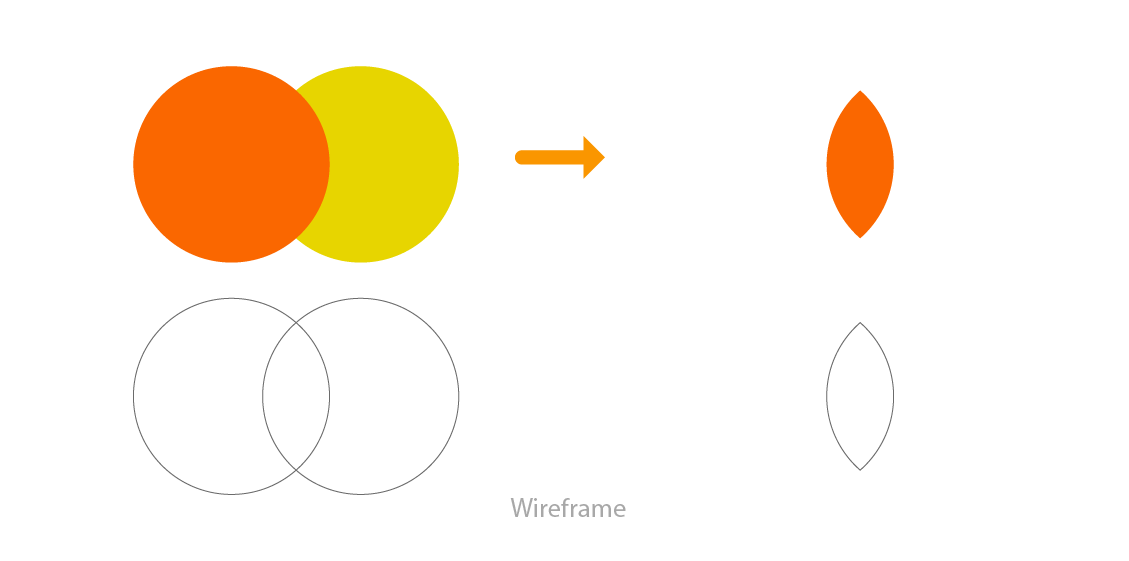
3. Intersect
4. Exclude
5. Divide
6. Trim
7. Crop
8. Merge
9. Outline
1. Unite
Combines two shapes
1. Unite
2. Minus Front
3. Intersect
4. Exclude
5. Divide
6. Trim
7. Crop
8. Merge
9. Outline
1. Unite
Combines two shapes
2. Minus Front
Takes out the shape from the front shape
3. Intersect
Only intersecting area will remain
4. Exclude
Intersecting area will be removed
5. Divide
Divides all shape and creates individuals shapes (This is used in color separation)
6. Trim
Bottom shape is subtracted from front shape
7. Crop
Leaves front shape and divides the intersecting area
8. Merge
Seperates all colors and unites same colors
9. Outline
Turnes vector to strokes
10. Minus Back
Subtracts everything from back to the front shape
Tuesday, December 18, 2012
Converting line art to full color design (Monsters)
I did a design for a client. He's business is printing shirts and recently he asked me to trace his quick sketch and turn it into a full color design. I used pen tool, PATHFINDER, stroke and other tools from Adobe Illustrator.
2. Photoshop the line art to make sure it's clean and clear. Meaning your image needs to have good contrast so the blacks are deep black. Paste it inside the artboard then lock the layer with the line art and create a new layer for the vectors named "Vector".
3. In the Vector layer trace all the black outline using the pen tool. You'll then create strokes around the outlines. You can also use PATHFINDER to help you reshape your vectors.
Using the pen tool is easy as click and drag. First click on where you want the node to start and drag it to the direction you want the next node to be.
TIPS:
• Shortcut "P"
• You can also click the node twice so the anchor points wont follow your next node.
• Clicking alt before realising the pen tool will give you much accurate direction of the anchor points.
Finished outline:
4. When your done with the outlines next is adding it's fill color.
Adding gradient fill is probably the hardest part, seeing your design in color for the first time is scary and needs allot of attention. :)
Fill in the highlights and the shadows of your monsters. :)
Doing that you need to go to Gradients tab and click on the gradient bar. On default, the gradient bar shows black and white, to change the colours you can drag and drop colour swatches on the sliders. Position the sliders until you get the effect that you desire.
TIPS:
• Shortcut "G"
• Select the vector you want to edit then click and drag to change the direction of the gradient.
Final Color:
Labels:
adobe illustrator,
art,
converting,
cute,
design,
full color,
house,
illustrate,
invade,
line,
line art,
monsters,
pathfinder,
pen tool,
print,
roof,
shirt,
stroke,
technique,
tutorial
Thursday, December 6, 2012
Sunday, November 25, 2012
Raftkiki comes to play
Subscribe to:
Posts (Atom)